How to use Snipe-IT for Jira With Jira Automations
Triggering a Jira Automation on Changes to Linked Assets
You can use Jira Automation to trigger on changes made to the Snipe-IT Assets IDs field or any other custom label field you have configured to be used by Snipe-IT for Jira, with the Field value changed trigger.
Be aware that if you are using an Automation with the Work Item created trigger in a Jira Service Management space where users are selecting the assets via the request form. And need the Snipe-IT for Jira custom field data later in the rule. You need to add a Delay action for 10 seconds and after that fetch the work item data with a Re-fetch work item data action. This is needed as Snipe-IT for Jira is only filling the custom label field after the work item has been created and not as part of the creation.
Using Jira Automations (or Other Tools) To Link Assets
The Snipe-IT Assets IDs or other custom label fields used by Snipe-IT for Jira can be set using a Jira Automation or other tools. The label needs to be formatted in the SITE_ASSETSTYPE_ASSETID format (E.g., codefortynine-demo_hardware_49).
If you want to use the Jira Cloud REST API to set the field(s) you can use a PUT /rest/api/2/issue/{issueIdOrKey} request as documented here with the following body:
{
  "update": {
    "customfield_XXXXX": [
      {
        "add": "YOUR_LABEL"
      }
    ]
  }
}
Using Snipe-IT Asset Data in Jira Automations
You can use data of your Snipe-IT assets in Jira Automations by using the Send web request action.
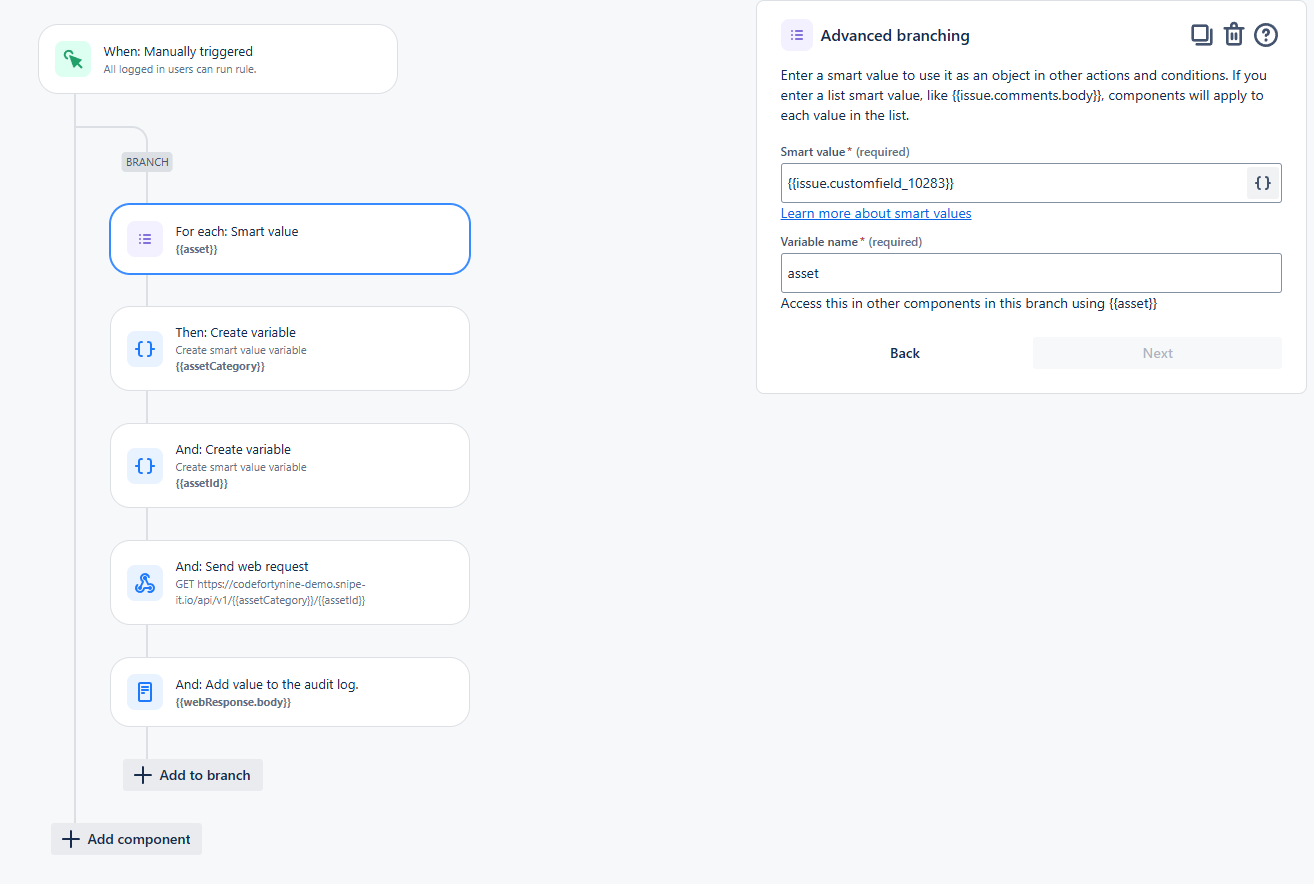
First, you need to use an Advanced branching branch. In this branch, you will iterate over all the labels (assets) in the custom label field Snipe-It for Jira is using to store linked assets. For that, you can use the {{issue.customfield_XXXXX}} smart value, where XXXXX needs to be replaced by the field ID of your specific custom field.

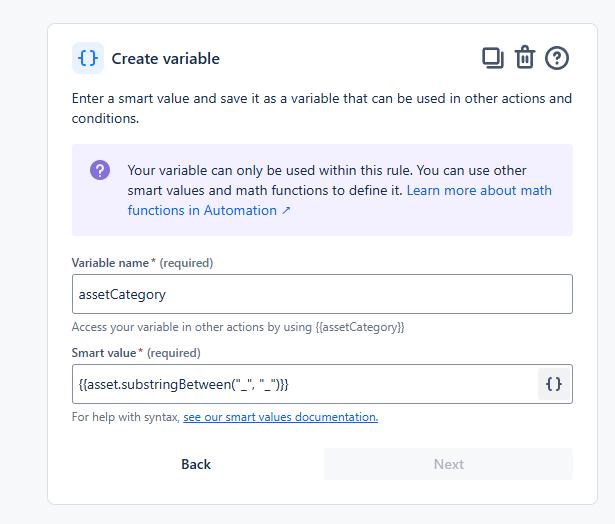
The assets are stored as labels in the SITE_ASSETSTYPE_ASSETID format (E.g., codefortynine-demo_hardware_49). We can extract these values to make requests to the Snipe-IT API and retrieve asset data. For that, we use two Create variable actions. One, will be set to the smart value {{asset.substringBetween("_", "_")}}. This will give the asset category/type needed for the API call. Next, we will set a variable to the smart value {{asset.substringAfterLast("_")}}. This variable will provide the asset ID for our API call.

.png?inst-v=f2d0cc63-fe88-487f-b447-a9935e1c5e5a)
Now we can construct our Send web request action. The web request URL is constructed with our two variables we have defined above. E.g., https://YOURSNIPEITINSTANCE/api/v1/{{assetCategory}}/{{assetId}}
The HTTP method needs to be GET and the Web request body should be Empty.
The headers need to be configured as described here using a Snipe-IT API key.
Header | Value |
|---|---|
|
|
|
|
|
|
Also, don’t forget to check the Delay execution […] option.
.png?inst-v=f2d0cc63-fe88-487f-b447-a9935e1c5e5a)
After this, you can use the {{webResponse.body}} smart value to retrieve all kind of values from your Snipe-IT asset to use in the automation. This way you can run automations conditional on some asset values or use these values to save them to a custom field.

