Setup AzureAD
Create new App registration
Go to App registrations > New registration.
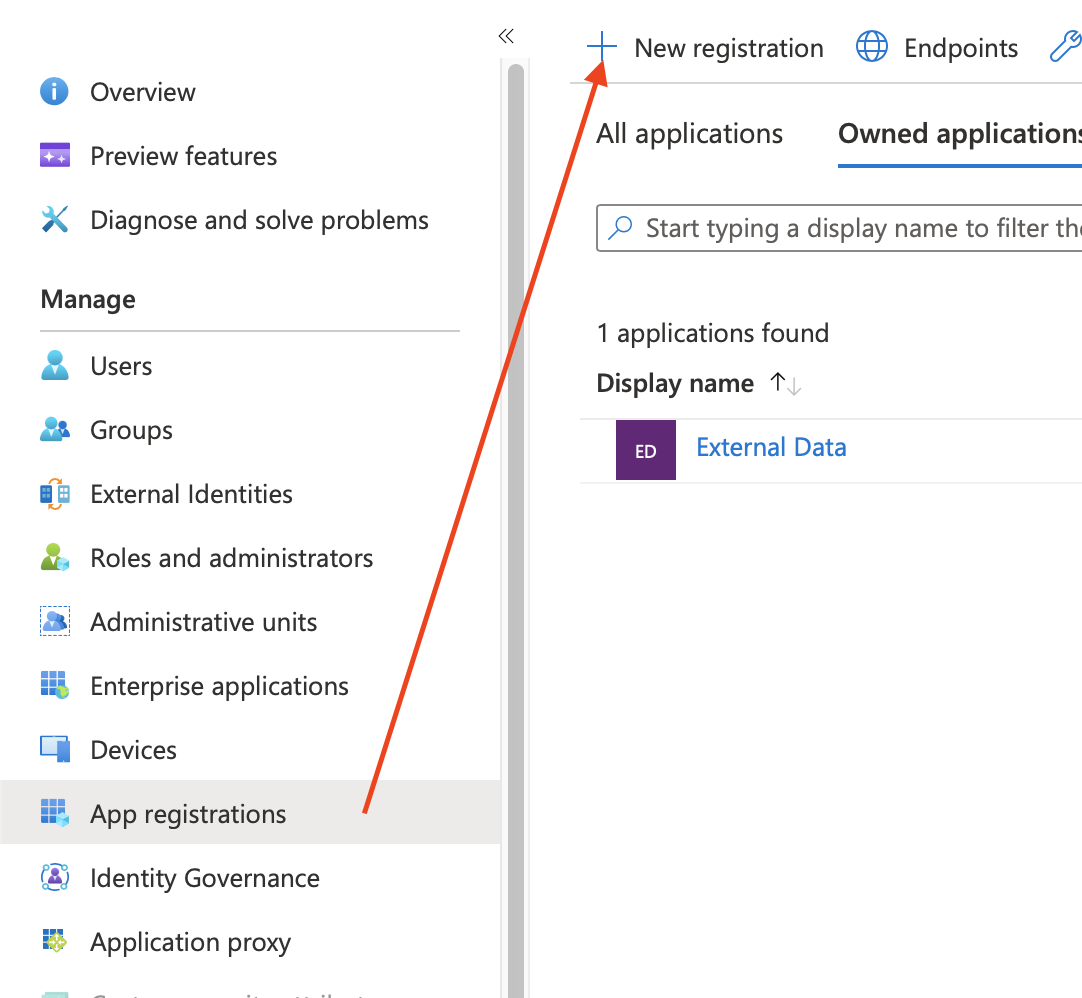
Give the application a name like External Data for Confluence to make sure you later know what this is used for and create it.
Authentication
Go to Authentication > Add a platform
Select Web and enter the redirect URL from External Data (this must be the same as in the data source configuration later) and finish the step with Configure
https://external-data-for-confluence.codefortynine.com/signin-dynamic-oauth

Certificates & secret
Go to Certificates & secrets > Client secrets > New client secret
Set a descriptive description and set an expire range. Keep in mind that you have to update the data source after the secrets is expired.
Make sure to note the Value which will only be visible directly after creation. We will need this value later in the setup of the data source.

API permissions
Go to API permissions > Add a permission
Select Microsoft Graph (or another service you want to access) > Application permissions
Now select the API you want to access. In our example we use the User.Read.All permission.
This permission needs Admin consent so we now go to Grant admin consent for ...

Collect endpoint & ClientID
Go to Overview > Endpoints and copy the following endpoint
OAuth 2.0 token endpoint (v2)
Go to Overview > Application (client) ID and note the value
Setup External Data
Create new Data Source
Go to External Data for Confluence > Data Sources > Add Data Source
URL
See a full list of available API endpoints of Azure here
In this example we want a list of all users
https://graph.microsoft.com/v1.0/users
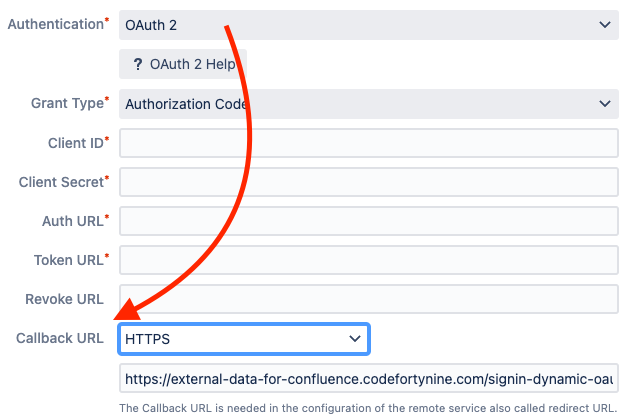
Authentication:
Select Authentication OAuth2 > Grant Type > Authorization Code
Client ID & Client Secret
Enter Client ID that you find here: Overview > Application (client) ID
Client Secret is the secret value that was created in the Certificates & secrets section
Endpoints
Endpoints are service specific URLs for receiving an access token. Auth & Token URLs are required for all services. Only some services have a dedicated revoke endpoint. Azure AD does not have one so the field can be left empty.
Auth & Token Endpoints:
Auth Url: https://login.microsoftonline.com/{tenant}/oauth2/v2.0/authorize
Token Url: https://login.microsoftonline.com/{tenant}/oauth2/v2.0/token
Revoke Url:
The Callback URL is a readonly field. You need to add this url to your list of Authorized redirect URIs at your remote service configuration.
Scopes
Scopes define the permission to specific parts of data.
In this example we want to access the users resource so we add the User.Read.All scope to the list. Keep in mind that the User.Read.All permission needs an admins consent so you might have to login with an admin account or grant access from the remote service configuration. No matter which resource you want to access always add offline_access to the scope list. This scope is needed to receive a refresh token from Azure due to the very short living access tokens.
User.Read.All offline_access
You can find a complete list of available Azure AD permissions here
Authenticate
Now you can trigger the process by clicking Authenticate. This will open a new window with the service login. If you need admin permission make sure the account you use to login has the right permissions. After logging in you need to consent to the scopes you defined earlier. The window will close again and the a green badge Authenticated should appear right below the button.
Now save & test the data source to make sure everything is working as expected.