
The Field Option Sync feature of External Data for Jira Fields is designed to enable synchronization of field options in Jira with data from external sources. This feature is useful for integrating dynamic dropdown or selection fields in Jira that are synchronized periodically without requiring user action to update the data.
Field Option Sync uses a scheduler to periodically update the field options in Jira's dropdowns (including single, multiple, and cascading choices), radio buttons, and checkboxes. It retrieves the latest values from an external database or other configured data source and writes them to Jira fields.
An example use case for Field Option Sync is integrating customer and product lists or other critical business data that needs to be up-to-date for operational efficiency into Jira.
Functional Highlights
-
Data Integration: Integrate your external data lists easily into Jira for up to 6.000 items.
-
Customization: Supports different field types and label options.
-
Automated Field Option Updates: Keep field options up to date without the need of manual interaction.
How to Setup a “Field Option Sync” Configuration
Step-by-Step Video-Tutorial
Learn how to sync data from an external data source into a custom field with the "Field Option Sync" feature of the External Data for Jira App. We will walk through the steps required to set up a Field Option Sync, including selecting the data source, choosing a result type, and navigating to the desired JSON path.
Configuration Guide
In the following instructions, we will show in detail how to configure Field Option Sync so that it meets the requirements of your project.
Note: You need a pre-existing custom target field (select or multicheckboxes) to successfully complete a Field Options Sync configuration.
Adding a Data Source
First we will have to select the data source for which we want to create a Field Option Sync configuration. Once we’ve selected the data source, the URL and the raw result of our data is being displayed below.
Example:
{
  "result": [
    {
      "id": 1,
      "name": "Mario Speedwagon",
      "role": "Owner",
      "alias": null
    },
    {
      "id": 2,
      "name": "Anna Sthesia",
      "role": "Developer",
      "alias": "Anna"
    }
  ]
}
We will receive a “Missing selection path to parse" error message until we have defined a JSON path, which we will do in the next steps of the configuration.
Result Type
TheResult Type will give you different options of how your data is being handled and mapped further on. The following options are available:
Dictionary vs List
The main difference between these two types is that list adds any new or changed value to the existing list, while dictionary can update existing values based on the mapping of the unique ID to its field option.
If you want your list to be updated upon any changes, choose dictionary (recommended).
Adding JSON Paths
If you have no experience with JsonPath, we recommend JSONPath Online Evaluator as a helpful resource for learning and experimenting.
Select List
We need to add the JSON paths referring to our data list. It is important here that the JSON path in Select List refers to an actual list.
Unique ID
The Unique ID must be a unique number or string (the same JSON path can be used in the Value field and the Search field).
This ID is used to match existing data when syncing new data. For example, if a label changes, this ID allows us to reference the datasource field with the corresponding entry in our database, ensuring consistency and accuracy in data synchronisation.
This ID is not set on the native Jira select list and is not accessible through the custom field. The ID from the custom field is set by Jira itself and is different from this Unique ID field.
Label
Label is the value that will later be displayed in the Jira target field. You can add multiple values here by putting them in curly brackets, like for example {$.role} - {$.alias}.
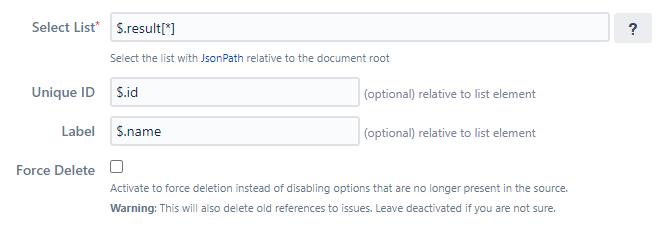
Force Delete
Activating Force Delete will unrecoverably delete missing values instead of just disabling them. This will also delete old work item references. We recommend leaving this option disabled when in doubt.
If you enable this option, you can specify a threshold in percent that can be deleted at most. For example, a value of 10 allows a maximum of 10% of the total number of items to be deleted at any one time. Anything above this will result in an error.
Checking the Result
In the gray test field below, we can now see the extracted value that will later appear in the Jira target field.
Sorting
Select whether your data should be sorted alphabetically (ascending/descending) or whether the data should be displayed in its original order.
Configuring the Target Jira Field
In the Target Jira Field, we define the custom Jira field into which the field options are synchronized. Select the custom target field of your choice. In this step, only existing fields that support the synchronization of field options are visible. Target fields can be created in the standard work item settings of Jira.
Supported Jira Custom Fields are:
-
Select List (single choice)
-
Select List (multiple choice)
-
Select List (cascading)
-
Radio Buttons
-
Checkboxes
Target Context
Selecting the Target Contextin which you want to synchronize. By default, the default context is selected, if available, or the first available context. This only needs to be changed if you want to target different contexts for the same Jira field.
Activate
Activate the field configuration so that the field appears on your Jira work item.
Update Interval
Specifies how often the field should be updated. We recommend finding an appropriate timeframe that matches the number of changes you expect in a given period. Need a lower interval? Please contact support. We will review the options on a case-by-case basis.
Troubleshooting
Handling of Missing Values
The app will automatically enable and disable values for you. If a value is missing, the app will deactivate it in Jira (and reactivate it when the value reappears).
Warning If you enable "Force delete" (see above), missing values will be irretrievably deleted instead of just deactivated.
Duplicates
Since Jira does not allow duplicate field options, the application will filter out duplicates when they are detected. In some cases this can lead to unexpected edge cases. Please make sure you do not allow duplicates at the data source level.
Sync Error Notifications
In the "Settings" section you can specify whether you want to receive error notifications. If this option is enabled, you will receive an email whenever an error occurs, but only once a day to avoid spam.
Data Flow
Selecting the appropriate field configuration type is crucial. To illustrate how the field type interacts with your external data sources, the following diagram provides a visual representation of the trigger mechanism and data processing flow for the Field Options Sync field configuration:
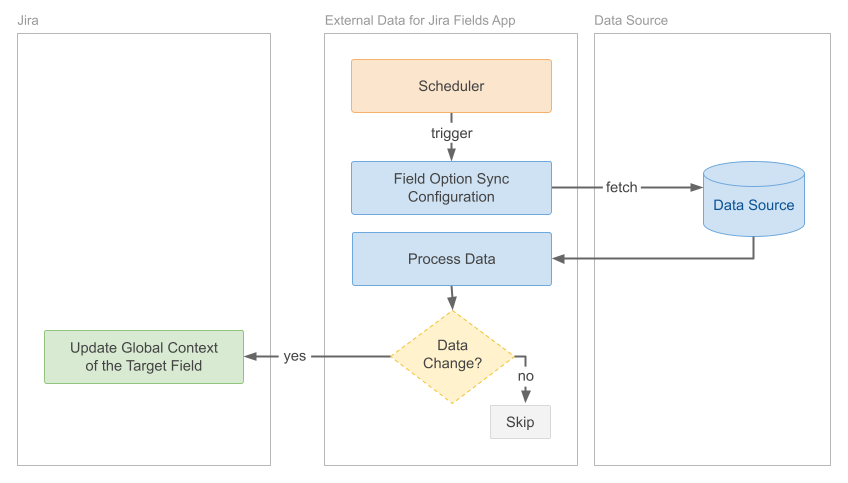
If you are unsure whether you have selected the correct field type, you may find our Field Configurations Comparison page helpful, which lists process diagrams and sample use cases for each field type.