
Dependant Field
Dependent fields in Jira are designed to update dynamically based on changes in a based on changes on another custom field within a work item. They automatically update their values in response to specific triggers, such as status or value changes in any custom field. This dynamic behavior is configured through a set of conditions defined in the dependent field configuration. Dependent fields are updated whenever a work item is created or modified.
Functional Highlights
Automated Field Value Updates: Values automatically adjust based on changes in parent fields.
Automated Workflows: Simplify processes by reducing manual data entry and updates.
Tailor-Made Field Configurations: Create interdependent fields to match your specific space needs.
Configuration Guide
Step-by-Step Video-Tutorial
This video tutorial will walk you through the process of setting up and configuring a dependent field in Jira using External Data for Jira Apps. We provide a use case scenario and explain how to select a data source, set up a parent field, create a nested search, and specify the values of your JSON list to display the results of the dependent field. We also show you how to customize your value output or create templates, and provide troubleshooting tips.
https://www.youtube.com/watch?v=eeA6zxuPW2UGetting Started Quickly: Basic Setup Steps at a Glance
Select and filter your data source.
Prepare your value.
Select a target field to view the results.
Step-by-Step Configuration Walkthrough
Selecting the Data Source
Add and/or select the data source that you would like to use.
In the following example, we will use a data source with the following JSON result:
{
  "userlist": [
    {
      "id": 1,
      "name": "Mario Speedwagon",
      "username": "mario"
    },
    {
      "id": 2,
      "name": "Anna Sthesia",
      "username": "anna"
    }
  ]
}
Setting up a Context Filter (Optional)
The context filter allows you to specify which part of your data source should be used in a dependant field based on the values present in a Jira work item. This is particularly useful when your data source produces a uniform JSON output for all work items, but you need to extract specific, relevant data for each individual work item.
Example Use Case: Suppose you want to add a dependent field to your work item that displays a user's real name based on a selected user name. Let us also assume that you have a pre-existing Jira custom select list field named customfield_10010 from which you can select the usernames. The context filterexpression would then look like this:
$.userlist[?(@.username=='{$.issue.fields.customfield_10XXX.value}')]Your data selection is now dependant on the value of customfield_10010 in each work item and the dependant field will dynamically show the real name associated with the chosen username for each specific work item.
Please note that context filter values relating to numbers must be written without quotation marks, e.g.:
$.userlist[?(@.id=={$.issue.fields.customfield_10XXX})]Available Work item Values and Filter Expressions
You can use a variety of values to determine what data should be pulled from the source using the Context Filter. Available Work Item Values and their corresponding JSON filter expressions are:
Issue Key:
$.issue.keyIssue Id:
$.issue.idSpace Key:
$.issue.fields.project.keySpace Name:
$.issue.fields.project.nameCustom field - Text:
$.issue.fields.customfield_10XXXCustom field - Select list:
$.issue.fields.customfield_10XXX.valueOrganizations - Jira Service Management -
$.issue.fields.customfield_10XXX[0].nameAssignee Account Id:
$.issue.fields.assignee.accountIdCreator User Key:
$.issue.fields.creator.keyCreator Display Name:
$.issue.fields.creator.displayName
Force List Result
The "Force List Result" option is designed to maintain consistency when your context filter returns a mix of single or multiple elements. Without this option, it can be challenging to construct JsonPath selections when only a single element is returned. By enabling this option, the result is always treated as a list, ensuring uniformity and simplifying subsequent JsonPath operations.
Simulating the Result
The field raw results will simulate the real time results of your current configuration.
Troubleshooting: In case you’re experiencing errors, please make sure you have a value pre-selected in the respective custom field within the Jira work item while testing the context filter.
You can change the work item which is used in the simulation with the option Work Item Context, in case you want to test it with a different work item.

More examples and details about context filters can be found in the dedicated Context Filter section of our documentation.
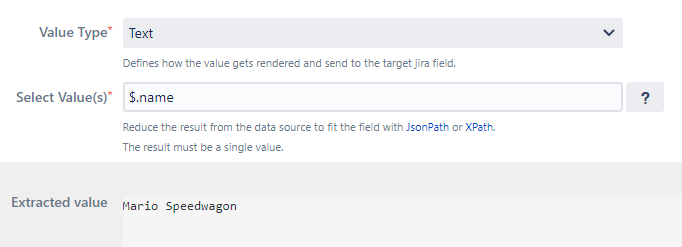
Value Type
The Value Type defines the type of data your dependant field will contain. The Jira Target Field provides a list of potential target fields in the dropdown menu.
Supported field types are:
DateTime
Extension Info Panel
Extension Search
Number
Select List (single choice) (must be the same value as in the dropdown list)
Select List (multiple choice) (values must exist in the dropdown list)
Text
TextArea
Url
UserPicker (must be the Jira accountID of the user you want to select)
UserPicker - Multi (must be the Jira accountID of the user you want to select)
Example: Back to our use case from above. If the dependant field is supposed to just output a simple username based on a selected name from your select list, you would choose Text as Value Type.
Select Value
Specify which value(s) from your JSON list should be displayed in the dependant field later on, using the respective JSON path.
Example: For our use case example, you would use the JSON path $.name to display the full name of the user in your dependant field:
Customisation and Templates
You can also customize your value output by adding custom text around your value or building templates.
For example:
prefix__{$.name}__postfixThis will result in prefix__Mario Speedwagon__postfix.
You can also build templates:
{$.name} ID:{$.id}This will result in: Mario Speedwagon ID:1
Select a Target Field
Select the target custom field for your dependant field. Please ensure the custom field type is compatible with the value type specified in the previous step.
Valid combinations are:
Value Type | Target Jira Field(s) | ||
|---|---|---|---|
Text | Short Text | Paragraph | URL Field |
Text Area | Paragraph |
|
|
Number | Number Field |
|
|
DateTime | Date Time Picker | Date Picker |
|
URL | URL Field |
|
|
UserPicker | User Picker (single user) |
|
|
UserPicker - Multi | User Picker (multiple users) |
|
|
Select List (single choice) | Select List (single choice) |
|
|
Select List (multiple choices) | Select List (multiple choices) |
|
|
Extension Info Panel | External Data - Info Panel | ||
Extension Search | External Data - Search Field | External Data - Search Field (Multiple Choice) | |
How to Add Hyperlinks With Text to Paragraphs
To add a hyperlink with a text different to the URL to to a Jira field that supports Rich Text (Paragraph) you need to format the result the following way: [Custom Text|codefortynine.com]
Update Conditions
Set the update conditions of your dependant field:
Always after work item creation or update (default): Triggers an update after a work item is created and after each work item update.
Once after work item creation: Triggers an update only once after a work item is created. The dependent value must be available during work item creation for the dependency to work.
Only if target Jira field is empty: Triggers an update if the target field is empty.
Only after work item update: This option only triggers an update when a work item is updated. It is especially useful when using automations. Set up your automation to run immediately after a work item is created. After the automation completes, it will automatically trigger the dependent field to update based on any changes made.
Note: To prevent looping, our system ignores work item events if an update occurs within 5 seconds of a previous update.
Empty Behaviour
Specifies how an empty result or a missing dependency is to be handled.
If no Context Filter is defined in Dependant Field, the Empty Behaviour won’t trigger
Clear Values: If enabled, the target field is cleared when results are empty or dependencies are missing.
Default Values: If enabled, the target field is automatically populated with a predefined value when results are empty or dependencies are missing.
Multi-Select List: Selection Behaviour
When targeting a multi-select-list or multi-user picker, you can choose between two selection behaviours:

Append missing options (default): This behavior will only append values to the current selection without removing any existing values.
Replace entire selection: This behavior replaces any existing selection with the new selection created by the dependent field.
Enabled Spaces
This option allows you to specify which spaces within your Jira instance can use the dependent field. If no spaces are explicitly selected, the dependent fields are activated for all spaces by default.
Work Types
You can define which specific work types within your Jira spaces can contain the dependent fields here. If no specific work types are selected, the dependent fields will be available for all work types by default.
Enable Logging
Logging is always helpful for monitoring and debugging. When activated, all activity related to dependent fields, including updates, conditions, and errors are being captured. It helps Teams to make informed decisions about necessary adjustments or enhancements to improve efficiency and effectiveness based on the logs.
Read more on logging here.
Setting the Field Order
If you have more than one dependent field, you can use this option to change the order of your fields. This is especially useful in a setup with multiple interdependent dependent fields that build on top of each other.
Error Notifications
In the Settings , you can choose to receive error notifications. If this feature is enabled, you will receive an email immediately after an error occurs, limited to one email per day to avoid excessive notifications.
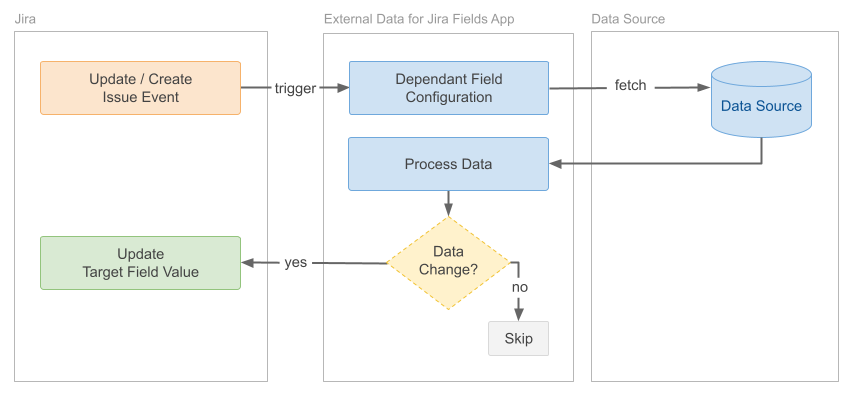
Data Flow
Selecting the appropriate field configuration type is crucial. To illustrate how the field type interacts with your external data sources, the following diagram provides a visual representation of the trigger mechanism and data processing flow for the Dependant Field configuration:
If you are unsure whether you have selected the correct field type, you may find our Field Configurations Comparison page helpful, which lists process diagrams and sample use cases for each field type.