
If you are setting up new Search Fields, we suggest using the Search Field (Custom Field) for the largest feature set and best compatibility.
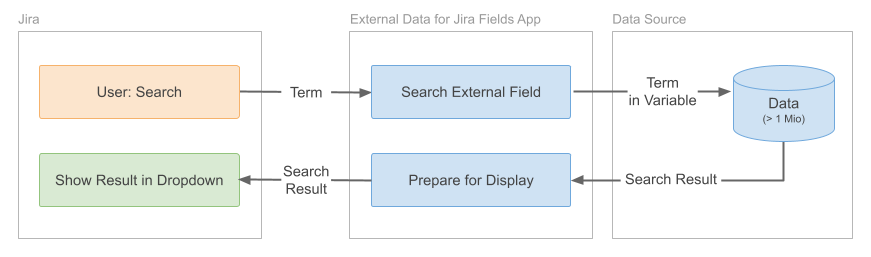
On this page, we will dive into the details of our External Search function. We'll also cover how to set up and use the search field to search data from an external search endpoint and display the results in your work item screen. The search field can be used both in a Jira work item and on a JSM landing page.
Field Design and Functionality
This field type allows you to use the capabilities of an external search endpoint to perform a search. You can personalize the display of search results in the configuration and define which specific values are gathered and displayed.
In most cases, this function demands a data source that is able to process a variable representing the user's search input. The key advantage of this search option is that you’re working with a search result instead of a complete set of potential values.
How to Setup and Configure a “Search Field - External”
Video-Tutorial
This video tutorial briefly walks through the most important functions and gives a short introduction on how to setup and configure the external search field. Learn how to fully customize the search field and the output of the results to your individual purposes.
Configuration Guide
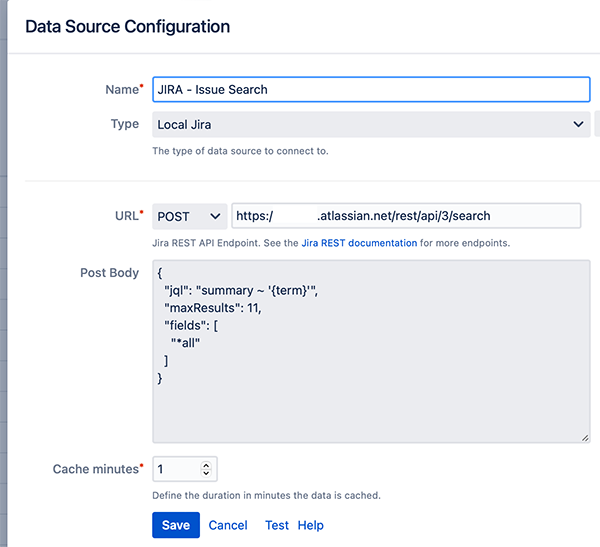
Data Source Setup
First, you need to configure a data source for your external search.
Example: Let’s assume you want to search your Local Jira work items with {term} as your input variable. The data source configuration would then look like this:
Creating Search Field
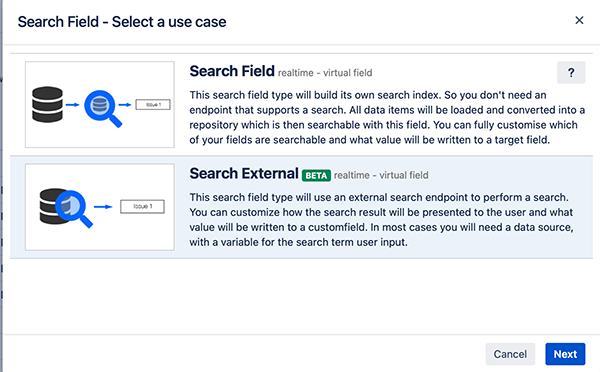
The next step is to create a corresponding Search Field. Select Search > Search External as a use case type.
Variable Usage
Select the data source which you’ve configured in step one and select term as Search Term Variable in the dropdown menu. This will automatically prepare the variable for the user input.
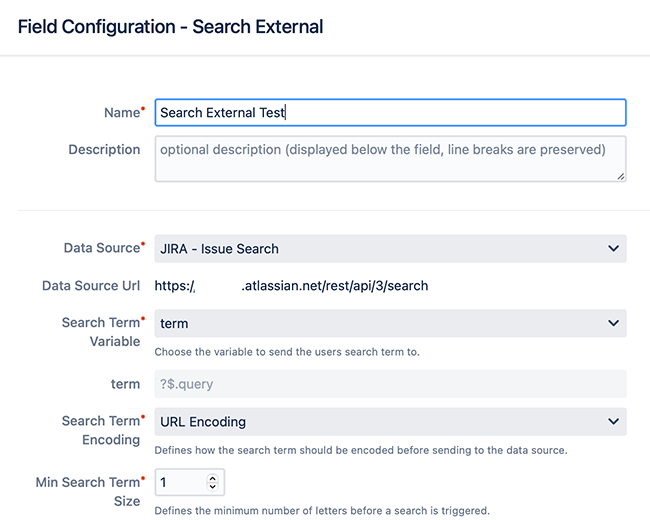
Search Term Encoding
Depending on how you send the search term to your data source encoding might be necessary. You can decide between URL Encdoing which is optimised for usage within an URL or JSON Encoded which is optimised to work within a JSON POST.
Min Query Size
With this value you can customize how many characters a user must type before the search query will be triggered. Zero will trigger a search immediately.
Example:
{
  "startAt": 0,
  "maxResults": 10,
  "total": 2,
  "issues": [
    {
      "id": "10170",
      "key": "THEP-58",
      "fields": {
        "summary": "Issue 1",
      }
    },
    {
      "id": "10171",
      "key": "THEP-59",
      "fields": {
        "summary": "Issue 2",
      }
    }
  ]
}
Context Filter (Optional)
Context Filter allows you to filter the search result based on work item values (optional). You can define dependencies of the search on other fields (nesting) here.
Examples and details about Context Filter can be found in the dedicated section of the documentation.
Select Result
Add the JSON path including the name of your data list here. Please make sure to not just select a single value.
Example:
$.issues[*]
ID Field
ID is the unique identifier that identifies an item within your data set (must be a unique number or string).
This field is used to identify a selected value later. You can use the same JSON path in the value field and the result view field.
Example:
$.id
Result View Field
Define how the drowdown list is being rendered here.
$.fields.summary
Value Field
Define JSON path(s) to values in your data list that you want to be written to the target custom field once the user selects them.
Example:
$.fields.summary
This will write Issue 1 into the target custom field
Key:{$.key} summary:{$.fields.summary}
This will write Key:THEP-58 summary:Issue 1 into the target custom field
Value Label (Optional)
Define JSON path(s) to the values in your data source that are supposed to be displayed as selected values later on. (Is the same as Value Field if left empty)
Example:
{$.key}: {$.fields.summary}
Result will be THEP-58: Issue 1
Enable Multi-select
This options allows you to select more than one value. Values can be seperated either by ; or by {break}.
Example:
A selection of multiple values with the separator ; would look like this:
value1;value2;value3
By using Text Field (multi-line)/ Paragraph search values are being displayed in a vertical list. To accomplish this, set the separator to the following value:
{break}
This will enforce a single line per value and would look like this:
value1
value2
value3
When using a Labels field type, the separator will be ignored and each value will be its own label tag. When using a Labels field, be aware that whitespaces within a value will split the label into multiple label tags.
Target Jira Field
Target Jira Field defines the Jira custom field to which the value(s) of the selected options are being written to. You can specify those value(s) in Value Field.
Work Item Refresh (advanced option)
If activated, this field will trigger a work item page refresh after a value is selected or deselected. A work item page refresh is useful if you want any change to be reflected in the target field without a manual page refresh. A work item refresh can affect usability and performance as it will fully reload all fields.
Filter Match (optional)
You can filter the search to only match specific spaces, work types or request types. By selecting Any, you’ll get results that matches any of the selected filters while choosing All means, all of the defined filters must apply for matches in order to be shown.
Jira Service Management
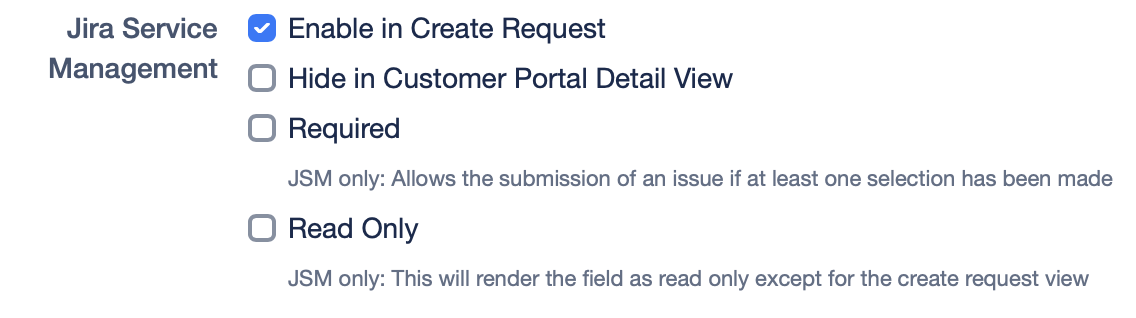
Jira Service Management consists of:
-
Enable in Create Request
Enables this field on the create request screen of the Jira Service Management customer portal. You can use filter section to define which Request types shows this field. -
Hide in Customer Portal Detail View
This option hides the JSM fields in the Customer Portal Detail View. However, if 'Enable in Create Request' is selected, users can still select the JSM field when creating a request, but it will not be visible in the Portal Detail View. -
Required
This will allow the user to submit the work item only if one selection has been made -
Read Only
This will render the field as read only except for the create request view
Combining Fields
A search field can be combined with an Info Panel or a dependant field. Use this option whenever you want the search to output additional search-related informations and/or custom fields.
Positioning
When you’re using multiple search fields in combination with info panels you might want to put them in a specific order. By default fields are sorted by name (ascending).
Example:
To overrule the default settings for two different search fields, use the Position field for the search you want to appear below the other one by choosing a value higher than 1. The field with the lowest number will appear at the top.
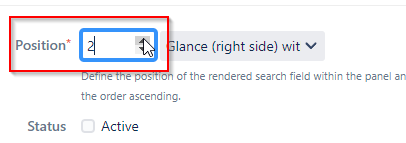
Note: For usability reasons, numbers can also be 0 or lower.