Automation for Jira via Workflows
There are different ways to have our app and Jira Automation work together. Read more about how you can integrate Deep Clone for Jira in your automated workflows.
How to Trigger Deep Clone From Jira Automation (Company-managed)
This guide only applies to company-managed Jira spaces (projects). Look here if you want to trigger a Deep Clone with a Jira Automation in a team-managed Jira space (project).
If you want to trigger Deep Clone with Jira Automation, we recommend to work with Deep Clone post functions and (global) looping transitions - meaning that the status of origin is also the status of destination.
.png?inst-v=aae6df2b-c0bd-4ecf-be24-7027057a9538)
This is how you can set up a Jira Automation with (global) looping transitions.
Add a global looping transition to your workflow.
Add a Deep Clone post function to the looping transition.
Create a new Jira Automation rule with an action that triggers the looping transition.
Click on “+ add regex to distinguish between multiple transitions to the same status”
Define a transition match with the name of your global looping transition (e.g. Clone), to make sure that the correct transition is triggered.
.png?inst-v=aae6df2b-c0bd-4ecf-be24-7027057a9538)
Now you can trigger a Deep Clone via Jira Automation without changing the status of a work item.
Make sure that your automation rule doesn’t cause a loop that creates infinite clones. Work items that are created with Deep Clone can trigger automations of “Work item updated” rules.
Global looping transitions can be removed from the work item view by adding the condition “Hide from User” to the transition.
If Deep Clone and Automation overwrite each other, you could insert a ‘refetch work item data’ action immediately after the trigger in Automation for Jira. In ‘more options’ you can manually configure a delay which would solve your problem.
Read more about creating global looping transitions in the Atlassian Community.
Read more about Jira workflows in the Atlassian documentation.
Read more about Jira automation in the Atlassian documentation.
How to Trigger Deep Clone From Jira Automation (Team-managed)
Due to limitations of team-managed spaces (projects) in Jira Cloud, it isn’t possible to add a Jira Post Function Clone to a transition in the workflow. To trigger Deep Clone in a team-managed space, you need to use our Deep Clone for Jira REST API.
Configure Jira Automation
Select the wanted trigger for your Jira Automation (and add if-conditions if needed)

(Optional) Add if-Conditions

Add Send web request action

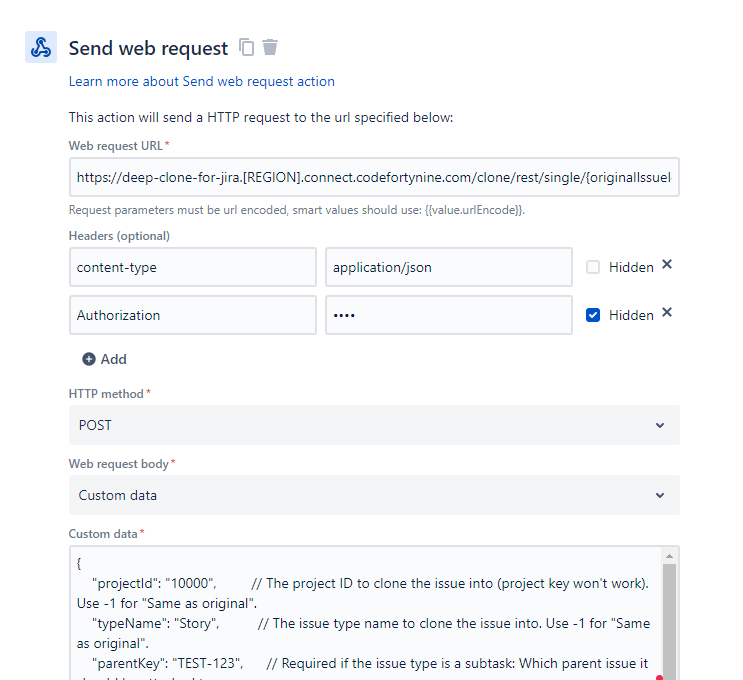
Configure Deep Clone for Jira REST API Web Request
Web request URL either:
Single Clone:
https://deep-clone-for-jira.[REGION].connect.codefortynine.com/clone/rest/single/{originalIssueIdOrKey}Project Clone:
https://deep-clone-for-jira.[REGION].connect.codefortynine.com/clone/rest/projectRank Work item:
https://deep-clone-for-jira.[REGION].connect.codefortynine.com/clone/rest/rank/clonedIssuesRank
You have to replace [REGION] with your hostname suffix. You can find out how to determine your suffix here.
Headers (optional)
content-type: application/json
Authorization: Basic User:Password
You can retrieve your User and Password under ⚙️ Settings > Marketplace apps > Deep Clone for Jira > REST API
You need to encode the “User:Password” string with Base64 and use the encoded string in the Authorization header
HTTP method: POST
Web request body: Custom data
Add the right JSON body to configure your clone

How to Trigger a Jira Automation From Deep Clone (Incoming Webhook)
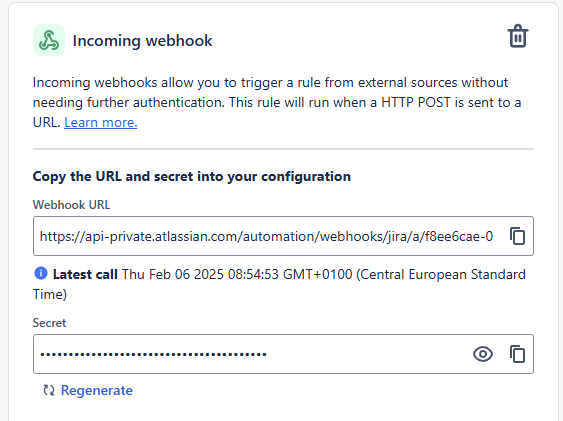
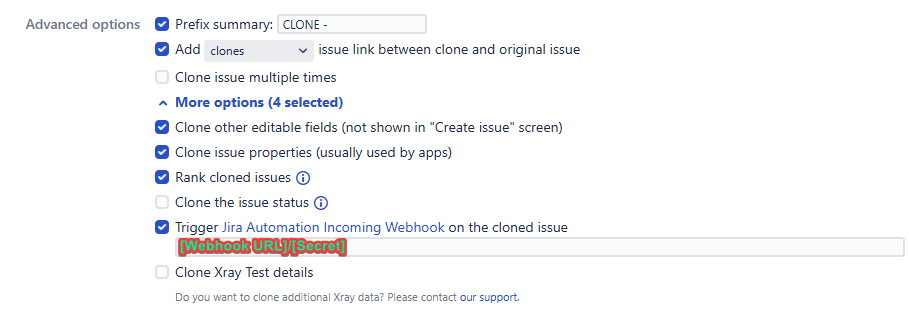
You can also let Deep Clone trigger a Jira Automation Incoming Webhook on the work items created by Deep Clone. Just create a Webhook (using the first option, “Work items provided in the webhook HTTP POST body”) and adjust Deep Clone with the Webhook URL and adding the Secret at the end of the URL:


Make sure that the Jira Automation rule is either global or, if it’s a “Space (Project) rule”, within the target space where the cloned work item is created.
Beware of infinite loops between Jira Automation and any Workflow Post Functions, possibly triggered by Jira Automation as well.

